Das 1x1 der Shimano Rollerbrake
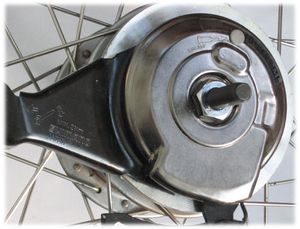
Dieser Artikel versammelt Informationen rund um die Shimano Rollerbrake. Sie ist eine Art Trommelbremse, die an vielen Shimano Nexus Nabenschaltugen, eingen Freiläufen und Vorderradnaben optional nachgerüstet werden kann. Weiterführende Artikel auf diese Seite sind:
- Die richtige Bremse für mein Fahrrad
- Technische Informationen zu Nexus und Alfine Drei-, Vier-, Sieben-, Acht- und Elfgangnaben
- Shimano Produktlinien und Schlagworte
Rollerbrake: Aufbau und Einsatzgebiete
Eine Rollerbrake ist eine Art Trommelbremse und sie ist zugangesteuert. Wie auch bei Rücktrittbremsen sind die Bremsflächen aus Metall und werden mit Fett geschmiert.
Der feststehenden Teil der Rollerbreke wird zwischen Muttern auf der Nabe von Nexus Naben geklemmt. Shimano Alfine Naben sind den Nexus Naben sehr ähnlich, setzen aber Scheibenbremsen mit dem proprietären Shimano Centerlock System ein, die mit Kontermuttern ähnlich wie bei Kassetten befestigt werden.
Die Rollerbrake ist sehr praktisch für den Einsatz in der Stadt, wo es wenige lange und steile Abfahrten gibt. Sehr vorteilhaft ist die Wetterunabhängigkeit und dass sie wenig Wartung benötigt. Man kann sie einfach komplett als Einheit ersetzen, ohne dass man wie bei Trommelbremsen üblich, auch die Nabe oder wie üblich das ganze Laufrad ersetzen muss. Wenn die Trommel verschlissen ist, ersetzt man sie einfach. Einige Modelle der Rollerbrake mit verschiedenen Größen wurden verkauft. Sogar das kleinste Modell bekommt ein Hinterrad eines Solo Fahrrads zum blockieren und rutschen.
Nachteile? Nur Shimano Nexus (Nabenschaltung) und Nexave (Kassetten) Naben haben Aufnahmen für Rollerbrakes. Nur große Rollerbrakes mit großen Kühlrippen können genug Hitze abführen, um auf langen Abfahrten die Geschwindigkeit zu kontrollieren. Kein Rollerbrake Modell kann als Schleppbremse für Transporträder oder Tandems eingesetzt werden. Es gibt Berichte, dass das Fett in der Bremse Feuer gefangen hat während langer und steiler Abfahrten. Überhitzung in diesem Umfang zwingt zum Tausch der Bremse und dem Tausch der Lager in der angrenzenden Nabe. Ein Grund mehr, eine Wasserflasche am Fahrrad mitzuführen...
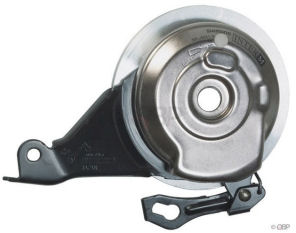
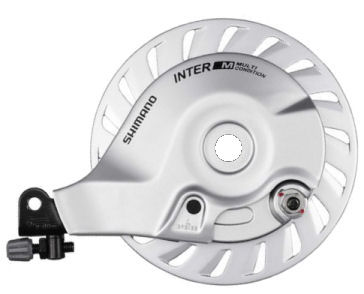
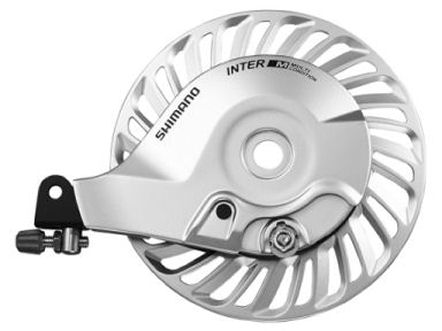
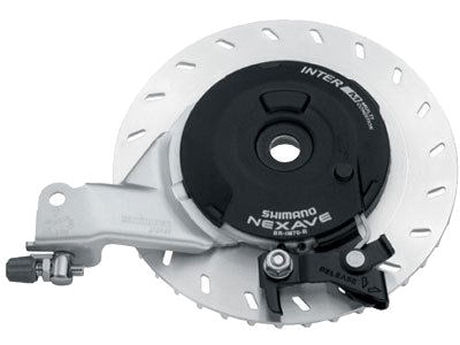
Folgende Bilder von Rollerbrakes sind im gleichen Maßstab.
- Einsteigermodell Rollebrake IM41
- Shimano Rollerbrake IM55
- Shimano rollerbrake IM80
- Rollerbrake IM70.
Man beachte die Kühlrippen auf der Rückseite
Weil Rollerbrakes wie Rücktrittbremsen fettgeschmiert sind, erzeugen sie im nicht aktivierten Zustand ein wenig Widerstand. Es gibt Rollerbrakes für vorne, jedoch riet Sheldon Brown von deren Einsatz ab und meinte, dass konventionelle Cantilever-Bremsen für vorne um einiges besser sind.
John Allen bemerkt ergänzend: Seit diesem Ratschlag von Sheldon Brown sind wieder einige Jahre ins Land gegangen und Shimano hat inzwischen verbesserte Versionen der Rollerbrake auf den Markt gebracht. Jedoch sind die Beanspruchungen an eine Vorderradbremse höher als an eine Hinterradbremse und es gibt weiterhin ein Problem mit der einseitigen Last auf die Gabelscheide wie bei jeder Vorderradnabenbremse. Eine besonders widerstandsfähige Gabel sollte eingesetzt werden, bei der die Drehmomentstütze in eine spezielle (angelötete) Klemme befestigt werden muss. Jedoch hat eine Rollerbrake nicht die Tendenz einer Scheibenbremse, ein Vorderrad aus den Ausfallenden zu ziehen (bei Einsatz von schlechten Schnellspannern). Rollerbrakes für vorne haben den unrühmlichen Power Modulator, der die Bremswirkung limitiert.
- Siehe auch
Innenleben
Eine Rollerbrake hat zylindrische Rollen um eine zentrale vielflächige Nocke. Die Rollen pressen gegen drei Bremsbeläge auswärts gegen die Bremstrommel. Drei Bremsbeläge geben gleichmäßigere Auswärtskräfte auf die Trommel als konventionelle Trommelbremsen mit zwei Bremsbelägen.
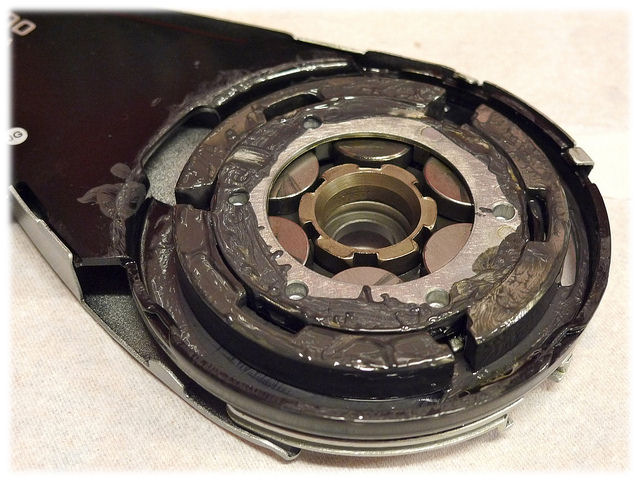
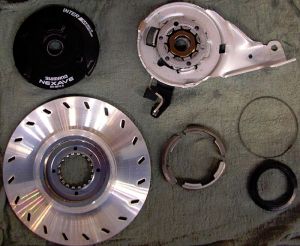
Vielen Dank an Henry Cutler von Workcycles in Amsterdam für das Bild, das die Innereien eine Rollerbrake zeigt. Von Innen nach Außen sieht man: die Nocke, sechs Rollen (teilweise verdeckt vom Haltering, der sie in Position hält, drei Bremsbeläge und die untere Hälfte des Gehäuses. Die Bremstrommel passt oben auf diesen Aufbau und um die Bremsbeläge. Die andere Hälfte des Gehäuses passt über die Bremstrommel und hält den Aufbau zusammen. Im Bild sieht man einige Nasen, die aufgebogen wurden, um das Gehäuse zu öffnen und um die Bremstrommel abheben zu können.
- Herr Ober, eine Rollerbrake in halbem Gehäuse!
Montage einer Rollerbrake
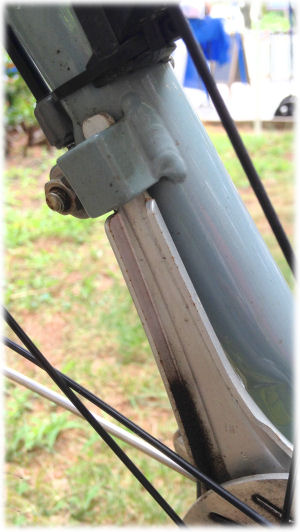
A rear Rollerbrake's reaction arm attaches to the left chainstay using a clamp, or sometimes a brazed-on or welded-on fitting. The special fitting for a front Rollerbrake is shown in the photo below. It goes without saying that the cable to a front hub brake on a suspension fork must be run in housing, but the cable to a front hub brake with a rigid fork must also be run in housing, because flexing of the fork during braking can tighten the cable and lock the brake. We leave it to your imagination what will happen if you ignore this advice.
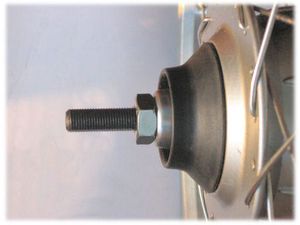
The image below shows the left side of a Shimano Nexus 8-speed internal-gear hub without Rollerbrake. There is a rubber cap, held in place by a nut and flanged washer:
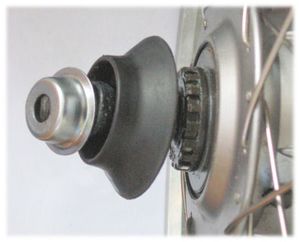
Removing the nut, flanged washer and rubber cap reveals the Rollerbrake splines:
The Rollerbrake is installed in place of the rubber cap and flanged washer, and secured in position by the same nut. Splines on the brake drum engage the ones on the hub. Some Rollerbrake models require a spacing washer between the drum assembly and outer nut -- check which ones may apply to your combination of brake and axle. A link to technical documents is later in this article.
The reaction arm (at left in the photo below) must be securely attached to the left chainstay or fork blade. Leave the nut that holds the Rollerbrake only finger-tight, and leave the left axle end nut loose until you have installed the hub in the dropouts and secured the reaction arm to the chainstay. The nut which secures the Rollerbrake projects above the face of the shell, and can then be tightened with a 17 mm cone wrench. An easy mistake to make is to forget to tighten this nut, and only tighten the axle end nut (the one at the outside of the dropout) against this nut. Then the brake will be loose on the axle, and the shell can tilt and rub on the rotating brake drum assembly.
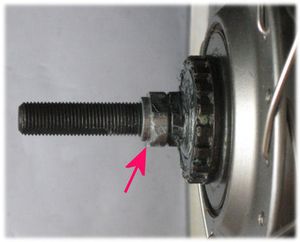
A locknut with a shoulder (red arrow in the photo below) holds the adjustment of the hub's left bearing cone and supports the Rollerbrake, or the flanged washer. If no Rollerbrake is installed, you can reduce the overlocknut dimension by leaving the cap and flanged washer off, but then you must replace the shoulder locknut with a nut which has a larger surface to press against the dropout. You could use the nut which held the cap and flanged washer in place, or a thinner locknut. The axle threading is 3/8 inch (9.5 mm) x 26 TPI. Some weather protection for the hub bearing is lost if the rubber cap or Rollerbrake is left off. Unscrewing the bearing cone to add grease is a good idea when making this modification. You might also install a different weather barrier, for example a rubber O-ring.
Montage von Hebel und Zügen
The Rollerbrake works with most common brake levers, other than levers intended for use with direct-pull brakes. The lever must be able to pull at least 14.5 mm of cable.
Attachment of the cable to a Rollerbrake varies, though there is usually a cable housing stop with an adjusting barrel on the reaction arm. With some front Rollerbrakes, the cable-housing stop attaches to a brazed-on fitting on the front fork. The inner cable may clamp directly under a nut on the brake, or to a fitting with an anchor bolt which attaches to the cable. Specifics are covered in the Shimano technical documents linked in the next section of this article.
Again: the cable to a front hub brake must run down the fork blade inside a cable housing. Flexing of a fork blade due to braking can tension an open cable, locking the wheel.
Technische Dokumentation von Shimano
You may search for technical documents for numerous Rollerbrake models at
this URL
at Shimano's technical information site. Mouse over the links for pop-up ballons which will identify more modelas than are shown in the list. Shimano technical documents are available in many languages: a language selector appears at the upper right corner of the screen. Shimano manuals include:
Rollerbrake dealer's manual (applies to many but not all models).
Rollerbrake maintenance manual
Wartung
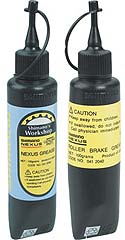
A Rollerbrake should be relubricated periodically, using special Nexus brake grease -- there's a small rubber access plug on the side of the brake unit. You can just pop off the plug, put the nozzle of the grease tube up against it, and squeeze.
A grease gun with a short nozzle will not do the job well, because it does not squirt the grease in far enough. You could use a needle which goes in as far as the Shimano tube does. Such needles are most commonly used to inject grease inside the rubber boots of automotive universal joints.
Mechanics who regularly service Rollerbrakes recommend adding grease before first use, and partially disassembling the brake during periodic service to clean out the old grease. Internal drag can increase markedly as the grease becomes contaminated. Mechanic Jeff Bertolet comments:
The life cycle of a brake goes something like this: add small amount of grease (pea size amount) in addition to factory grease when installing a new brake. After some months, the grease is washed away by rain. The brake is now dry and has poor or nonexistent modulation which locks the wheel with the slightest pressure on the lever. A normal consumer would regrease the brake immediately at this point, but our bikes [bike-share fleet bikes] can go a few weeks between being checked by staff. If it is being ridden dry for weeks, the drum and/or shoes are damaged beyond repair. Regreasing at this point can bring the brake modulation back to normal levels temporarily, but the brake will lose all stopping power within a few weeks or months depending on how much it is ridden.
Rebuilding of Rollerbrakes is not supported by Shimano, but mechanics have figured out for themselves how to do it, and so to extend the life of the brake.
To disassemble a Rollerbrake, spread the tabs to separate the shell as shown in the photo above. Remove the circular spring clip which retracts the brake shoes, and the brake shoes. You may leave the rollers and roller retainer in place.
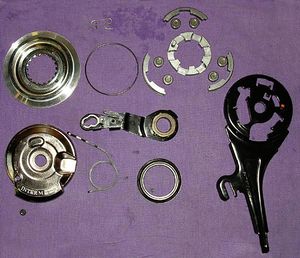
Aaron Goss, of Aaron's Bicycle Repair in Seattle, has sent the two photos below of Rollerbrakes, fully disassembled and cleaned. These photos may be helpful when rebuilding a brake. The photo below is of a small, front Rollerbrake.
Some higher-end Rollerbrakes have brake shoes with peaked (roof-shaped) braking surfaces. The brake must be disassembled further to get these brake shoes out, and these brakes are also more difficult to reassemble. The photo below is of an BR-IM70R rear brake, the same one shown in the image at the top of this page. This is a large Rollerbrake with peaked brake shoes.
There are links below to a Web page and a video about disassembly and reassembly of such a brake. The video's narration is in Russian but the procedure is clear enough from the images.
Clean out the old grease with solvent. Coat the inside with Phil Wood oil and pack it with high-temperature grease before reassembling. People who are especially concerned for efficiency will leave the grease out, and use only the Phil Wood oil -- though it can drip out and make a mess, and must be replenished more frequently.
With some Rollerbrakes, the shoes must be held outward against the drum to keep the circular spring clip in place. A page linked below shows how this may be done. As the shoes of a Rollerbrake wear, slack in the cable will increase, as with other brakes. Readjust the cable using the adjusting barrel, and as necessary, by pulling more cable through the anchor bolt. The brake is worn out when the cable cannot be adjusted to apply the brake fully, or will not retract. Shimano has a wear measuring tool. See the maintenance manual in the list above for details.
If a Rollerbrake is worn out, the entire main assembly must be replaced. Shimano doesn't offer spare parts. External parts -- nuts, bolts, adjusting barrels, clamps etc.-- are available for replacement.
Siehe auch
Shimano tech Web site -- structure and function, troubleshooting charts etc. Shimano Nexus lubricants Video of disassembly and reassembly of a Rollerbrake with peaked brake shoes Web page about disassembly and reassembly of a Rollerbrake with peaked brake shoes Holding the shoes against the drum (read text under image) A blog post from Workcycles about rebuilding a Rollerbrake Harris Cyclery carries Nexus-equipped bicycles from several manufacturers, including: Breezer Bicycles Hubs to upgrade existing bikes Aaron's Bicycle Repair, Seattle, Washington, USA -- specializes in internal hubs
Quelle
Dieser Artikel basiert auf dem Artikel Shimano Rollerbrakes von der Website Sheldon Browns. Originalautor des Artikels ist Sheldon Brown.
- Sattelstützenmaße
- Ritzelabstände (Tabelle)
- Auswechselbarkeit von Vierkant-Kurbelaufnahmesystemen bei Innenlagern
- Kettenlinienstandards (Tabelle)
- Ein bequemer Sattel
- Nabenbreiten (Tabelle)
- Alles über Nabenschaltungen
- Shimano Nexus und Alfine Acht-Gang-Naben
- Reifengrößen
- Gute und schlechte Schnellspanner
