Montage und Justage von Zangenbremsen: Unterschied zwischen den Versionen
(→Hinterradbremse an Mixte-Streben: Bild hinzu) |
(→Zugführung von unten: Bild hinzu) |
||
| Zeile 132: | Zeile 132: | ||
===Zugführung von unten=== | ===Zugführung von unten=== | ||
Cable-from- | [[Datei:Cable-from-under.JPG|right|Zugführung von unten]]On a step-through (lady's) frame, mixte frame or monotube frame, a cable may be fed along the uppermost tube(s), then upward to a brake at the seatstays. This is the traditional routing on English three-speeds with lady's frames. It minimizes curves in the cable, and so it minimizes friction. | ||
Older sidepull brakes conveniently allow you to switch the positions of the the anchor bolt and adjusting barrel. Many newer brakes have the adjusting barrel threaded directly into the upper brake arm. With these brakes, a bolt-on cable stop can still be installed to replace the anchor bolt at the lower brake arm. As shown, the cable is threaded through the adjusting barrel at the upper brake arm, then secured with a second anchor bolt. This installation is inelegant but it works. Perhaps someday, someone will offer an anchor bolt assembly that threads into the upper brake arm...The installation shown, on a Raleigh Twenty bicycle, also uses a home-made drop bolt. | Older sidepull brakes conveniently allow you to switch the positions of the the anchor bolt and adjusting barrel. Many newer brakes have the adjusting barrel threaded directly into the upper brake arm. With these brakes, a bolt-on cable stop can still be installed to replace the anchor bolt at the lower brake arm. As shown, the cable is threaded through the adjusting barrel at the upper brake arm, then secured with a second anchor bolt. This installation is inelegant but it works. Perhaps someday, someone will offer an anchor bolt assembly that threads into the upper brake arm...The installation shown, on a Raleigh Twenty bicycle, also uses a home-made drop bolt. | ||
| Zeile 141: | Zeile 141: | ||
Routing the cable from underneath to the cable stop at the top of the head tube may be desirable on a front centerpull or cantilever brake on a folding bicycle so that there is enough cable to allow the handlebar and stem to be lifted off and laid alongside the frame. The cable housing is attached to the yoke. In this case, inverted cable attachment to drop-bar brake levers also can be under chainstayuseful (see John Allen's installation on his Raleigh Twenty). Routng the cable from underneath is also necessary on a Freestyle acrobatic bicycle with a rotor (which allows the front wheel/handlebar assembly to turn around and around without fouling the cable.). | Routing the cable from underneath to the cable stop at the top of the head tube may be desirable on a front centerpull or cantilever brake on a folding bicycle so that there is enough cable to allow the handlebar and stem to be lifted off and laid alongside the frame. The cable housing is attached to the yoke. In this case, inverted cable attachment to drop-bar brake levers also can be under chainstayuseful (see John Allen's installation on his Raleigh Twenty). Routng the cable from underneath is also necessary on a Freestyle acrobatic bicycle with a rotor (which allows the front wheel/handlebar assembly to turn around and around without fouling the cable.). | ||
===Hinterradbremse an den Kettenstreben=== | ===Hinterradbremse an den Kettenstreben=== | ||
Version vom 4. Juli 2018, 14:38 Uhr
Zangenbremsen sind Felgenbremsen. Im Zusammenhang mit diesem Artikel solltest Du auch Das 1x1 der Felgenbremsen lesen. Dort werden unter anderem auch folgende Aspekte erläutert, die auf alle Arten von Felgenbremsen zutreffen:
- Warum Felgenbremsen?
- Typen von Felgenbremsen
- Zentrieren
- Hebelübersetzung
- Geräusche/Quietschen
- Typen von Bremsschuhen
- Einstellen der Bremsschuhe
Die meisten Probleme mit Felgenbremsen werden durch exzessive Reibung oder schlechte Montage der Züge verursacht. Schlechte Einstellung oder Bremsen geringer Qualität sind zumeist keine Gründe.
- Siehe auch
- Züge - über dir richtige Montage von Zügen und Bremshebeln.
Zangenbremsen vs. Felgenbremsen an Anlötsockeln
Felgenbremsen lassen sich in zwei generelle Typen aufteilen. Zusammengefasst:
- Zangenbremsen sind selbsttragende Mechanismen, die am Fahrradrahmen (oder der -gabel) mit einer einzelnen Schraube je Bremse befestigt werden. Die Bremsarme reichen von oberhalb des Reifens abwärts. Sie müssen lang genug sein, um vom Montagepunkt aus um den reifen herum zu reichen.
- Bremsen zur Montage an Anlöstockeln, werden an beiden Seiten des Rahmens (oder der Gabel) separat befestigt. Sie benötigen spezielle angelötete oder geschmiedete Sockel am Rahmen bzw. an der Gabel. Die Bremse besteht je Laufrad aus zwei getrennten Armen, die beide individuell am Rahmen bzw. an der Gabel befestigt werden.
- Siehe auch Über Felgenbremsen an Anlötsockeln, falls das eher die Bremsen sind, an den Du gerade arbeitest
Zangenbremsentypisierung
Es gibt drei verbreitete Untertypen von Zangenbremsen:
Eingelenk-SeitenzugBeide Bremsarme schwenken um eine zentrale Schraube, die die Bremse mit dem Rahmen oder der Gabel verbindet. Die Zughülle ist an einem Arm befestigt und der innere Zug ist mit dem anderen Arm verbunden. Die Bremsschuhe von Eingelenk-Bremsen bewegen sich nur wenig (abwärts) während sie verschleißen und folgen auch gut verzogenen Felgen. Jedoch kann das zentrieren schwierig sein, da jeder Arm einzeln von einer Feder zurückgezogen wird. |

|
Zweigelenk-SeitenzugDie Bremsenzughülle ist an einem Bremsarm befestigt und der innenliegende Zug ist am anderen Arm befestigt. Der Mechanismus ist asymmetrisch aufgebaut. Ein Arme schwingt um die zentrale und ein Arm um ein Gelenk, dass sich dem Zug gegenüber oberhalb des Reifens befindet. Eine Kupplung verbindet die beiden Arme, so dass sich immer um den gleichen Weg in entgegengesetzter Richtung bewegen. Wenn man eine Bremse mit hoher Reichweite und die Bremse eine hohe Steifigkeit hat, ist die hohe mechanische Übersetzung dieses Bremstyps eine erwünschte Eigenschaft. Zweigelenk-Seitenzugbremsen lassen sich wegen der Kupplung zwischen den Bremsarmen sehr leicht zentrieren. An der Kupplung kann sich eine Zentrierschraube befinden. Wenn dieser Bremsentyp eine verzogenen Bremse folgen muss, rotiert sie um die zentrale Schraube und tendiert dazu, diese zu lockern. Der Bremsarm auf der Seite des versetzten Gelenks wandert am Reifen aufwärts, wenn der Bremsbelag verschleißt. |
 |
MittelzugJeder Bremsarm rotiert um ein Gelenk auf seiner Seite oberhalb des Laufrads. Die Bremsschuhe wandern beim Bremsenverschleiß aufwärts in Richtung Reifen. Mittelzugbremsen waren in den 1960er und 1970er verbreitet und sind weiterhin recht beliebt bei Fahrrädern, die eine große Bremsenreichweite benötigen. Diese Bremsen haben einen Querzug und setzen einen Zuganschlag voraus, der an Rahmen oder Gable montiert ist. Auf diese Weise ähneln sie U-Brakes-
|
 |
Reichweite
Reichweite ist die effektive Länge der Arme einer Zangenbremse. Diese wird vom der Mitte der Befestigungsschraube diagonal bis zur Mitte der Bremsschuhe gemessen. Reichweite wird gewöhnlich als Bereich angegeben, da man die Bremsschuhe zumeist zwischen 10 und 15 mm verstellen kann.
Die Größenordnungen für die reichweite gehen von 39 mm bis 108 mm. Es gibt einen historischen Trend hin zu Bremsen mit möglichst kurzer Reichweite, da neuere Fahrräder (insbesondere Rennräder für extrem schmale Bereifung und ohne Platz für Schutzbleche ausgelegt sind.
Die notwendige Bremsenreichweite hängt von der Rahmenkonstruktion (wie niedrig ist das Befestigungsloch für die Bremse) und dem Felgendurchmesser ab. Im Allgemeinen funktionieren Bremsen mit kurzer Reichweite besser, da ihr Potenziel sich zu verbiegen recht gering und ihre Hebelübersetzung sehr hoch ist. Bremsen mit hoher Reichweite benötigen eine stabilen Konstruktion und haben lange Ausleger unterhalb der Gelenke und zur Zugbefestigung, um diesem Problem entgegenzuwirken. Cantilever- und Scheibenbremse vermeiden diese Probleme, haben dafür aber andere Probleme.
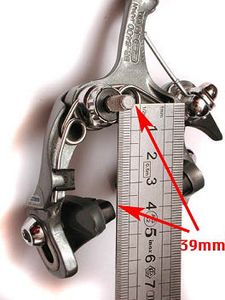
Diese Zangenbremse hat eine Reichweite zwischen 39 und 45 m9. Wie man sieht sind hier die Bremsschuhe gnaz nach oben geschoben. daher kann man 39 mm ablesen bei der Messung zwischen zentraler Befestigungsschraube und der Mitte des Bremsbelags
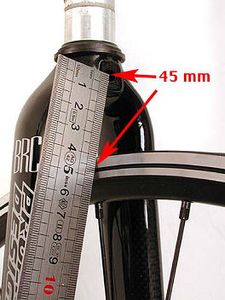
Diese Gabel- und Felgenkombination verlangen nach einer Bremse mit einer Reichweite die auf 45 mm eingestellt werden kann.
Die links abgebildete Bremse passt also.


Manche Leute sprechen von "kurzer Reichweite", "normaler Reichweite" und "langer Reichweite". Das ist jedoch Grundlage für einige Verwirrung und sollte vermieden werden. Durch die modische Entwicklung sind aus "normalen" Bremsenreichweiten von 47-57 mm inzwischen "lange" Reichweiten geworden. Inzwischen sind auch die entsprechenden Shimano-Bremsen mit langer Reichweite bis auf BMX Versionen verschwunden.
Derzeit haben Bremsen mit kurzer Reichweite 39-49 mm. Das ist inzwischen de-facto Standard bei Rennradbremsen und kann inzwischen als "normal" angesehen werden. Jedoch ist es weiterhin korrekt von "kurzer" Reichweite zu sprechen.
Wenn man eine Bremse mit langer Reichweite benötigt, kann man diese mit einem Drop Bolt erhöhen. Es gibt auch Zweigelenk- und Mittelzugbremsen mit langer Reichweite.
Bei den meisten moderneren Bremsen ist die Reichweitenangabe auf der Rückseite eingestanzt. Bei der hier zu sehenden Shimano 600 Bremse ist die Reichweite 47 - 57 mm.
Montage von Zangenbremsen
Caliper brakes have a center bolt 6 mm or 1/4" in diameter, which fits through a matching holes in the fork crown or brake bridge of the frame. Traditionally, these bolts have been long enough to protrude all the way through, to be secured by a normal hex nut and associated washers. When a rear brake mounts to a curved surface on the brake bridge, you must use radiused washers (as shown in the photo below) to avoid crushing the brake bridge. If the mounting surface of the front brake is not radiused to fit the fork crown, a washer with a larger radius may be needed to support the brake and avoid unnecessary stress on the brake bolt. The fork crown is strong enough that it will not crush if the nut at the rear is attached using only a flat washer or lockwasher.
Secure mounting of the front brake is very important. A loose front brake will announce itself by rattling, but, unfortunately, some bicycles are already a symphony of rattles, and one more instrument may go unnoticed. If the brake comes off, the brake rotates forward with the wheel, then snags in the spokes. The cable tightens and yanks the handlebar violently to one side. The cyclist is pitched forward and may also suffer abdominal injury from the handlebar.
The front brake bolt or nut should have some kind of anti-rotation treatment, generally a nut with a nylon locking insert or an anti-rotation compound on the brake bolt. You may also use blue threadlock compound.
Versenkte Bremsenbefestigung
Most newer good-quality bicycles that use caliper brakes use recessed mounting to save weight and for a more elegant appearance. Calipers intended for recessed mounting have much shorter center bolts, which do not extend all the way through the crown/bridge. Frames/forks designed for recessed mounting have stepped holes...6 mm in front, 8 mm at the back. Instead of a conventional hex nut that takes a 10 mm wrench, a cylindrical nut is used, which is broached for a 5 mm Allen wrench.
 | |
| Recessed-Mount Rear Caliper
Uses 5 mm Allen Wrench |
Traditional Nutted Rear Caliper
with 2 radiused washers; uses 10 mm wrench |
Because the trend toward recessed mounting and toward short reach calipers happened simultaneously, most short-reach calipers come set up for recessed mounting. Medium- and long-reach calipers usually come with longer centerbolts for conventional mounting.
Montage von versenkten Bremsenbefestigung an älteren Rahmen
- Rear
- Here are three options:

- You might mount a rear brake for recessed mounting ahead of the seatstays, as long as the back side of the brake bridge can be safely drilled out. This is more likely to work with a single-pivot or dual-pivot brake, due to the difficulty of routing the cable with a centerpull. Use an 8 mm or USA letter-size O drill bit. A 5/16"drill bit is slightly smaller, and you may have to ream the hole slightly. Radiused washers (as shown on the nutted-style brake in the photo above) must be used if the brake bridge has no flat mounting surfaces. The washer that goes under the nut must be drilled out, and so must the brace of a baggage rack, if it attaches to the brake bolt. Remember to reverse the brake shoes if they are single-ended.
- Drilling out the brake bridge from the front is possible on most frames using a right-angle electric drill: the seat tube would get in the way of a normal. drill. Even Dremel makes a right-angle attachment.
- Front brakes for recessed mounting have bolts that are long enough to use them as rear brakes, if you substitute the appropriate washers and a 6 mm nut.
- Front
- Here are 3 options:
- Drill out the back of the fork crown, just as is described above for the rear brake.
- That's it if you can get two front calipers. Sometimes, you may have to deal with a pair of brakes, with one long and one short bolt. If you used the long one in back, you can use the short one in front two different ways:
- Drill out the back of the fork crown and use an extra-long recessed nut. These nuts are commonly available for use in carbon-fiber forks.
- Use the short recessed nut, but don't put it through the back of the fork. Instead, push it up into the inside of the steerer from the bottom. You can reach a 5 mm Allen wrench in through the hole in the back of the fork, and poke the short caliper bolt in from the front.
- You may need to shorten the recessed nut slightly to get it to fit inside your steerer.
- [That's Sheldon's suggestion -- I can't figure how this option would secure the brake adequately against the tendency of braking to rotate the shoes forward.-- John Allen]
Spezielle Bremsenmontagen
Hinterradbremse vor den Sattelstreben
It is most common to install a rear caliper brake behind the seatstays, but a baggage rack may interfere with the brake, or its cable. A brake installation ahead of the seatstays is neater!
Bicycle frames designed for nutted brake bolts don't care which way you install a nutted brake. As already described, a rear brake intended for recessed mounting may be installed ahead of the seatstays after drilling out the back of the brake bridge, the radiused washer, and the rack brace, if any.
To mount a brake ahead of the seatstays on a frame designed for recessed mounting, you may use a front brake made for recessed mounting, or a rear brake made for nut-type mounting.
A centerpull brake mounted this way will have a slightly odd cable pull and will work best on a tall frame.
Hinterradbremse an Mixte-Streben

On a mixte frame, the rear brake may be installed either above or below the middle set of stays. With a centerpull brake, an open cable may run from a cable stop just behind the head tube to the transverse cable, which passes either side of the seat tube. This installation results in an unusually effective rear brake, because there is little wasted motion in the cable. Another common approach on mixte frames is to use a pulley behind the seat cluster to redirect a cable downward to a centerpull brake at the seatstays. The convoluted cable routing results in much inferior brake performance.
Zugführung von unten

On a step-through (lady's) frame, mixte frame or monotube frame, a cable may be fed along the uppermost tube(s), then upward to a brake at the seatstays. This is the traditional routing on English three-speeds with lady's frames. It minimizes curves in the cable, and so it minimizes friction.
Older sidepull brakes conveniently allow you to switch the positions of the the anchor bolt and adjusting barrel. Many newer brakes have the adjusting barrel threaded directly into the upper brake arm. With these brakes, a bolt-on cable stop can still be installed to replace the anchor bolt at the lower brake arm. As shown, the cable is threaded through the adjusting barrel at the upper brake arm, then secured with a second anchor bolt. This installation is inelegant but it works. Perhaps someday, someone will offer an anchor bolt assembly that threads into the upper brake arm...The installation shown, on a Raleigh Twenty bicycle, also uses a home-made drop bolt.
With a centerpull brake, it is possible to route the cable from underneath by attaching a barrel adjuster to the yoke. The inner wire needs to be secured by an anchor bolt in the seat cluster area. This may conveniently be attached to a seatstay cable stop assembly, replacing a quick-release mechanism.
With a cable routing from underneath, rainwater can slide down the cable into the housing, and accumulate. In winter, it can freeze and disable the brake. For solutions to this problem, see advice in the article about cables.
Routing the cable from underneath to the cable stop at the top of the head tube may be desirable on a front centerpull or cantilever brake on a folding bicycle so that there is enough cable to allow the handlebar and stem to be lifted off and laid alongside the frame. The cable housing is attached to the yoke. In this case, inverted cable attachment to drop-bar brake levers also can be under chainstayuseful (see John Allen's installation on his Raleigh Twenty). Routng the cable from underneath is also necessary on a Freestyle acrobatic bicycle with a rotor (which allows the front wheel/handlebar assembly to turn around and around without fouling the cable.).
Hinterradbremse an den Kettenstreben
The rear brake is commonly mounted at the chainstays on folding bicycles and recumbents where cable routing to a brake at the seatstays would be inconvenient, or if there are no seatstays. A disadvantage of this location is that the brake is more exposed to dirt.
Siehe auch
- Das 1x1 der Felgenbremsen
- Züge - über dir richtige Montage von Zügen und Bremshebeln.
- Über Felgenbremsen an Anlötsockeln
- Einstellen von U-Brakes
Quelle
Dieser Artikel basiert auf dem Artikel Installing and Adjusting Caliper Brakes von der Website Sheldon Browns. Originalautor des Artikels ist Sheldon Brown.
- Sattelstützenmaße
- Ritzelabstände (Tabelle)
- Auswechselbarkeit von Vierkant-Kurbelaufnahmesystemen bei Innenlagern
- Kettenlinienstandards (Tabelle)
- Ein bequemer Sattel
- Nabenbreiten (Tabelle)
- Alles über Nabenschaltungen
- Shimano Nexus und Alfine Acht-Gang-Naben
- Reifengrößen
- Gute und schlechte Schnellspanner